Leave a Comment
进程管理supervisor的简单说明
背景:
项目中遇到有些脚本需要通过后台进程运行,保证不被异常中断,之前都是通过nohup、&、screen来实现,带着能否做一个start/stop/restart/reload的服务启动的想法找到里Supervisor。关于supervisor的介绍在网上大致搜索总结如下:
Supervisor是用Python开发的一套通用的进程管理程序,能将一个普通的命令行进程变为后台daemon,并监控进程状态,异常退出时能自动重启。它是通过fork/exec的方式把这些被管理的进程当作supervisor的子进程来启动,这样只要在supervisor的配置文件中,把要管理的进程的可执行文件的路径写进去即可。也实现当子进程挂掉的时候,父进程可以准确获取子进程挂掉的信息的,可以选择是否自己启动和报警。supervisor还提供了一个功能,可以为supervisord或者每个子进程,设置一个非root的user,这个user就可以管理它对应的进程。
说明:
1:easy_install 安装:
easy_install supervisor
2:pip 安装:
pip install supervisor
3:Debian / Ubuntu可以直接通过apt安装:
apt-get install supervisor
1)通过apt-get install安装后,supervisor的配置文件在:
/etc/supervisor/supervisord.conf
supervisor的配置文件默认是不全的,不过在大部分默认的情况下,上面说的基本功能已经满足。而其管理的子进程配置文件在:
/etc/supervisor/conf.d/*.conf
然后,开始给自己需要的脚本程序编写一个子进程配置文件,让supervisor来管理它,放在/etc/supervisor/conf.d/目录下,以.conf作为扩展名(每个进程的配置文件都可以单独分拆也可以把相关的脚本放一起)。如任意定义一个和脚本相关的项目名称的选项组(/etc/supervisor/conf.d/test.conf):#
#项目名
[program:blog]
#脚本目录
directory=/opt/bin
#脚本执行命令
command=/usr/bin/python /opt/bin/test.py
#supervisor启动的时候是否随着同时启动,默认True
autostart=true
#当程序exit的时候,这个program不会自动重启,默认unexpected
#设置子进程挂掉后自动重启的情况,有三个选项,false,unexpected和true。如果为false的时候,无论什么情况下,都不会被重新启动,如果为unexpected,只有当进程的退出码不在下面的exitcodes里面定义的
autorestart=false
#这个选项是子进程启动多少秒之后,此时状态如果是running,则我们认为启动成功了。默认值为1
startsecs=1
#日志输出
stderr_logfile=/tmp/blog_stderr.log
stdout_logfile=/tmp/blog_stdout.log
#脚本运行的用户身份
user = zhoujy
#把 stderr 重定向到 stdout,默认 false
redirect_stderr = true
#stdout 日志文件大小,默认 50MB
stdout_logfile_maxbytes = 20M
#stdout 日志文件备份数
stdout_logfile_backups = 20


[program:zhoujy] #说明同上
directory=/opt/bin
command=/usr/bin/python /opt/bin/zhoujy.py
autostart=true
autorestart=false
stderr_logfile=/tmp/zhoujy_stderr.log
stdout_logfile=/tmp/zhoujy_stdout.log
#user = zhoujy2)通过easy_install安装后,配置文件不存在,需要自己导入。
1:运行 echo_supervisord_conf,查看配置样本:
echo_supervisord_conf

2:创建配置文件:
echo_supervisord_conf > /etc/supervisord.conf详细的子进程配置文件:
样本:
;[program:theprogramname]
 ;command=/bin/cat              ; the program (relative uses PATH, can take args)
 ;process_name=%(program_name)s ; process_name expr (default %(program_name)s)
 ;numprocs=1                    ; number of processes copies to start (def 1)
 ;directory=/tmp                ; directory to cwd to before exec (def no cwd)
 ;umask=022                     ; umask for process (default None)
 ;priority=999                  ; the relative start priority (default 999)
 ;autostart=true                ; start at supervisord start (default: true)
 ;startsecs=1                   ; # of secs prog must stay up to be running (def. 1)
 ;startretries=3                ; max # of serial start failures when starting (default 3)
 ;autorestart=unexpected        ; when to restart if exited after running (def: unexpected)
 ;exitcodes=0,2                 ; 'expected' exit codes used with autorestart (default 0,2)
 ;stopsignal=QUIT               ; signal used to kill process (default TERM)
 ;stopwaitsecs=10               ; max num secs to wait b4 SIGKILL (default 10)
 ;stopasgroup=false             ; send stop signal to the UNIX process group (default false)
 ;killasgroup=false             ; SIGKILL the UNIX process group (def false)
 ;user=chrism                   ; setuid to this UNIX account to run the program
 ;redirect_stderr=true          ; redirect proc stderr to stdout (default false)
 ;stdout_logfile=/a/path        ; stdout log path, NONE for none; default AUTO
 ;stdout_logfile_maxbytes=1MB   ; max # logfile bytes b4 rotation (default 50MB)
 ;stdout_logfile_backups=10     ; # of stdout logfile backups (default 10)
 ;stdout_capture_maxbytes=1MB   ; number of bytes in 'capturemode' (default 0)
 ;stdout_events_enabled=false   ; emit events on stdout writes (default false)
 ;stderr_logfile=/a/path        ; stderr log path, NONE for none; default AUTO
 ;stderr_logfile_maxbytes=1MB   ; max # logfile bytes b4 rotation (default 50MB)
 ;stderr_logfile_backups=10     ; # of stderr logfile backups (default 10)
 ;stderr_capture_maxbytes=1MB   ; number of bytes in 'capturemode' (default 0)
 ;stderr_events_enabled=false   ; emit events on stderr writes (default false)
 ;environment=A="1",B="2"       ; process environment additions (def no adds)
 ;serverurl=AUTO                ; override serverurl computation (childutils)
说明
View Code
改成自己实际的配置文件:和①上面一样。
1)apt-get install 安装的supervisor直接可以通过 /etc/init.d/supervisor 运行:
/etc/init.d/supervisor start
2)通过easy_install 安装的supervisor运行supervisord 运行:
supervisord
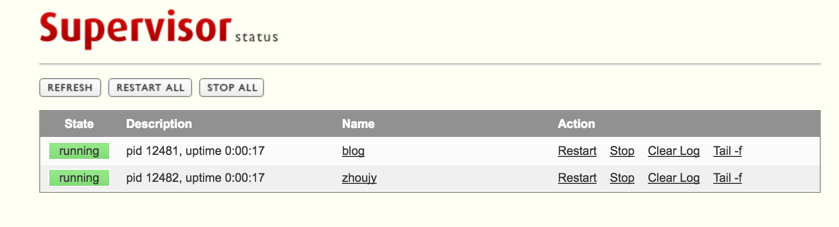
4:web界面操作
需要在supervisor的配置文件里添加[inet_http_server]选项组:之后可以通过http://10.211.55.11:9001来访问控制子线程的管理。
[inet_http_server]
port=10.211.55.11:9001
username=user
password=123
效果:
5:子进程管理(supervisorctl)
1) 查看所有子进程的状态:
# supervisorctl status
blog                             RUNNING    pid 2395, uptime 0:08:41
zhoujy                           RUNNING    pid 2396, uptime 0:08:41
2)关闭、开启指定的子进程:
# supervisorctl stop zhoujy
zhoujy: stopped

# supervisorctl start zhoujy
zhoujy: started
3)关闭、开启所有的子进程:
# supervisorctl stop all
blog: stopped
zhoujy: stopped
# supervisorctl start all
blog: started
zhoujy: started
4):其他参数:supervisor开启后子进程自动开启(autostart=true)和子进程退出后自动启动(autorestart=ture)
更多的参数可以看官方文档和supervisor(一)基础篇的说明。
总结:
我们需要的功能在上面介绍的supervisor的基本功能中已经实现,supervisor还有其他的一些功能:如进程组、web页面管理子进程、监控子线程情况等等,更多的信息可以去官网上查看。